What a pin does, and when it is worth the risk
A pin is a short length of rod that bridges the two halves of a joint, giving the adhesive a mechanical core. It matters most where a small contact patch carries weight or leverage: an arm holding a heavy weapon, a metal torso joined to plastic legs, a resin cloak on a slim connection, or a hand that has already broken once.
Pinning is not a step every model needs. Cypher, who wrote the pinning tutorial at Models Workshop, opens by saying pinning is effectively required if you want metal and resin models to last. That is one experienced hobbyist's judgement about the kits he builds, not a rule for every miniature on your shelf. A plastic arm joined with solvent cement is already a weld, and whether a pin adds anything there depends on the load and the geometry. In many cases it adds little; that is not the same as never.
The useful test is not whether the model was expensive. It is whether both sides of the joint have enough sound material to hold a pin, and whether that joint carries a load. Pinning metal miniatures is where the answer is most often yes, because a metal part is heavy for the contact area it sits on.
Judge the material before you drill
Two failure modes end a pinning job early. The first is a wall so thin the drill has nothing to sit in: a slender blade, a banner pole, an outstretched finger, the rim of a hollow base. A hole there can break through the side and leave a weaker part than you began with. The second is a hollow cast: resin figures are often rotocast or partly hollow, and a bit that feels like it is cutting can punch into empty space and split the shell.
Looking at the joint, and even filing across the contact face, only tells you about the surface you can see. It does not prove the unseen interior is solid, so treat it as one input rather than a green light.
- Read the kit: the material, the casting method, and any assembly notes that came with it.
- Use the known geometry of the part — how thick it should be, where mould lines and pour gates sit, whether it feels light for its size.
- Plan a safe depth for each side separately, and keep it conservative enough to leave material behind the hole.
- If a hollow or thin interior cannot be assessed, skip the pin or ask someone who has built that kit. Drilling into an unknown interior is how good parts get wrecked.
Set the part up so it cannot move, and keep your fingers out of the bit's path. Eye protection matters here, and the material or resin guidance that came with your kit still applies.
Match the pin to the bit, then check the fit
Start with a rod and bit of the same nominal size, so the pin slides in with light friction instead of rattling in a loose trench. Cypher makes the case plainly: people pin with paper clips, but unless you know the wire gauge you rarely get a good fit between hole and wire, so he uses matching drill bits and solid brass rod.
Nominal matching is a starting point, not a guarantee. The Army Painter lists its hand pin vise for drilling metal, resin and plastic miniatures and describes drilling pilot holes; it ships with 1.0 mm, 1.4 mm and 1.8 mm bits. That tells you what that kit holds, not what your joint needs, and the details are on The Army Painter's product page.
Check the pair on scrap of the same material. A spare piece of runner, a leftover base or a failed print shows how the bit bites and how much room the rod has in the hole. If the rod drops in with visible wiggle, step down a bit size or up a rod size. If it will not go in without forcing, the hole is too tight: ream it or change sizes, because forcing a rod splits parts and snaps thin bits. Treat the scrap as a fit check only; it says nothing about how a finished joint will hold up over time.
Measure depth on each part, not once for the pair
Mark the bit with a strip of tape at the depth you want, then lay the unmarked section alongside the outside of the part to see where that mark sits relative to the far wall. If the tape line would pass through the opposite side, shorten the target or move the hole.
Cypher uses a fingertip version of the same check: hold a fingernail against the bit where it meets the surface, withdraw the bit, and the distance from nail to tip is the depth you reached. He also warns against drilling so far that the bit punches out the opposite side.
The two halves rarely need identical numbers. What they need is compatible alignment and enough engagement to hold the rod while the adhesive cures. Measure the second part on its own terms, and write the numbers down if you are pinning several similar joints.
Start shallow, and leave the joint's fit alone
Cypher drills a shallow pilot hole, a couple of twists of the pin vise, and stops to check that it sits where he wants it. That pause is the whole technique: a hand pin vise turns slowly, so you can read the angle before the bit is buried.
If the part has locating lugs or a shaped step where the halves meet, leave them alone unless you have a specific reason to change them. They set the intended fit of the joint, and flattening them changes how the halves close. When the bit wants to skate off a curved face, start with a small mark or a light turn at low pressure rather than filing the joint flat.
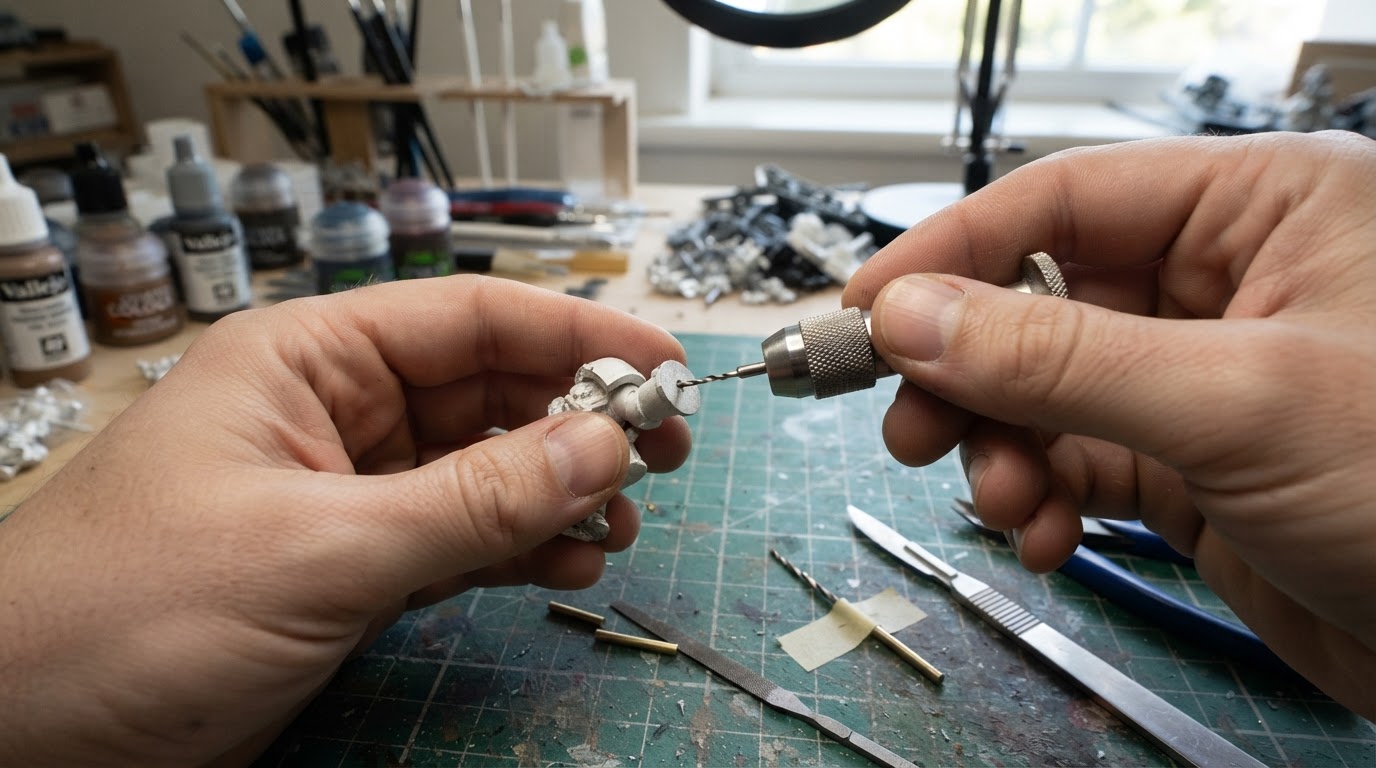
The Army Painter notes that power drills and larger tools risk over-drilling or damaging fragile plastic, resin and metal, and that a pin vise gives the user control over pressure and pace. Keep the bit straight, clear the swarf, and let the tool cut rather than pushing it.
If a hole wanders off centre, stop and reassess. Do not chase it with a bigger bit, and do not assume you can fill it and drill beside it: whether a repair is viable depends on the adhesive, the material and the wall you have left, and a second hole beside the first can weaken the part further. Decide case by case against those facts, or set the part aside and ask.
Transfer the mark gently
The second half has no hole yet, and its position has to come from the first. Cypher shows two ways to find it: leave a short stub of rod protruding and press the components together so the rod marks the undrilled face, or put a small blob of paint on the pin and press the halves together.
A removable marker or a dot of acrylic paint is the gentler option. Pressing a rod stub hard into a fragile part can dent or crack it, so use light, square pressure and stop if the part gives. Wipe the guide away after drilling if it sits outside the joint.
Drill the second hole to its own measured depth, check the angle against the pin, and stop before the far wall.
Dry fit until both halves close
Dry fitting is not a formality. Push the rod into the first hole, trim it so it engages the second hole without bottoming out, then bring the two halves together with no adhesive. The joint should close to its intended gap, the pin should not tilt, and nothing should need squeezing.
Cypher dry fits the rod before gluing and dry fits the assembled joint again after trimming. If your halves will not close, the pin is too long, the second hole is too shallow, or the angles disagree. Fix that now; once adhesive is in the joint, the error is much harder to correct.
Choose an adhesive that names your materials
Read the label's material list rather than the picture on the bottle. Polystyrene solvent cement welds polystyrene to polystyrene, which is right for plastic-to-plastic joints, but it does nothing useful for a brass pin in a plastic hole. Cyanoacrylate is the usual choice when the joint mixes materials — a metal pin and a resin arm, or a pin held inside a drilled hole. Our guide to plastic glue versus super glue for miniatures sets out that comparison.
Paint is the other variable. Adhesive bonds to the paint film rather than the material beneath it, so scrape or mask a bare contact patch at the joint even if that means touching up afterwards. If you are deciding how far to assemble before painting, whether to paint Warhammer before assembly covers the trade-offs of painting parts separately.
Cypher runs a small amount of superglue into the hole, pushes the rod home, wipes the excess and gives it a few moments. That is handling time, not the full cure printed on the label. The adhesive's own instructions and stated cure time stay authoritative, including any surface preparation or clamping guidance on the pack. Skip breath and moisture tricks and accelerators, and keep cyanoacrylate off cotton and wool, where it does not belong as a gap filler.
Brace the joint through full cure
Once both halves are together, the joint needs to stay still. Prop the model so the weight of the part is not pulling on fresh adhesive, or use a padded clamp on a sturdy section away from detail. Leave it for the cure time on the label, not the handling time, before you test the joint or put the model back in a case.
Support matters more on tall assemblies, where a small shift during cure sets the joint at an angle, and on repairs, where one half is already painted.
Pin or skip: a quick decision table
Situation | Pin it? | Check first |
|---|---|---|
Metal arm or weapon on a small contact patch | Often worth it | Material on both sides and a depth you can plan |
Resin part with a hollow or thin shell | Only at a cross-section you can verify | Whether the bit would break into empty space |
Plastic-to-plastic joint with a large mating face | Usually not, but it depends on load and geometry | Whether the joint carries weight or leverage |
Joint on an already painted part | Only with a bare contact patch | How much paint must be scraped back |
Slender detail such as a blade, banner or finger | No | Whether a thicker root nearby can take the pin |
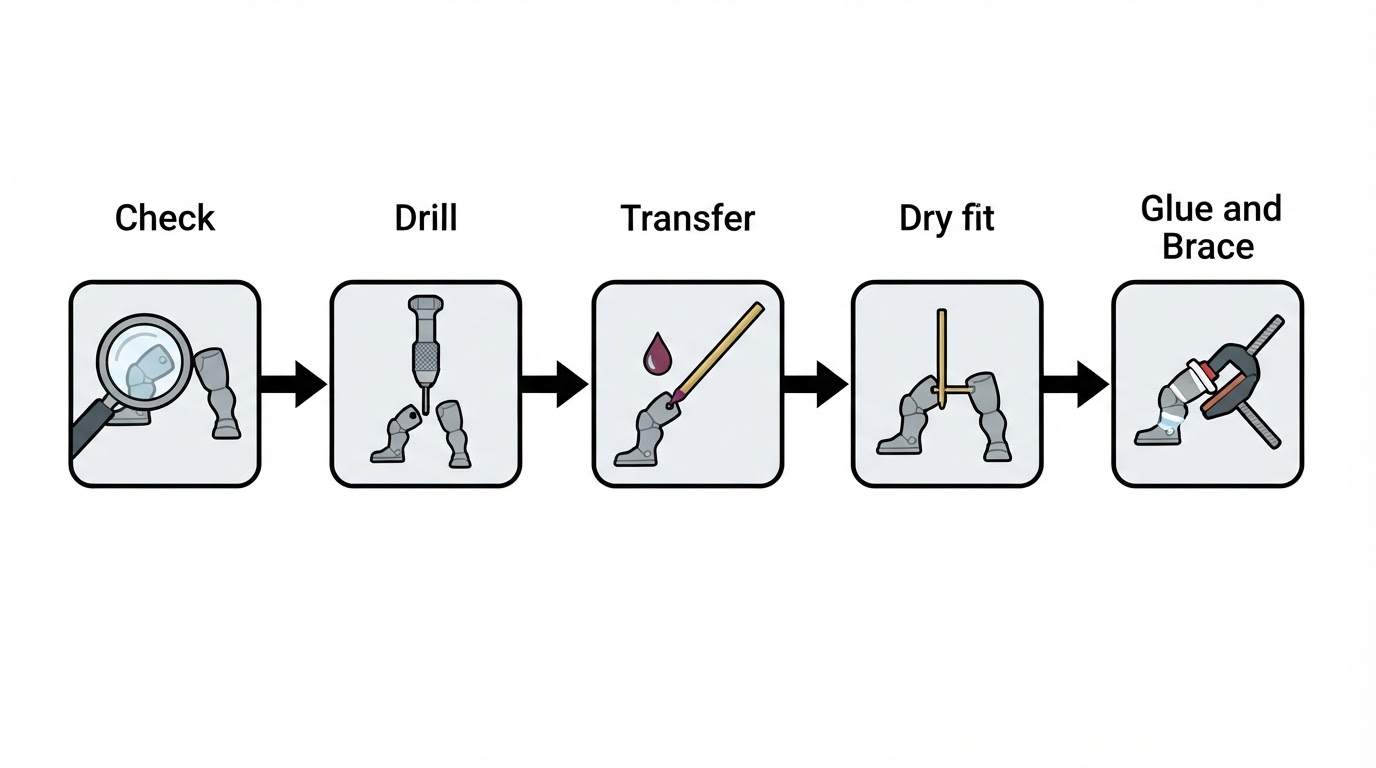
The working sequence
Check the material, match the rod to the bit and test the fit, measure depth on each part, drill a shallow pilot hole, transfer the mark, dry fit, glue with an adhesive that names your materials, then brace the joint through full cure. Each step is a chance to stop before the next makes an error permanent.
Sizing questions that come up every time
No universal pin diameter or hole depth applies across kits. Choose a small pin and bit that leave enough sound material around the hole, sized to the part in front of you: measure the wall, keep material around the pin, and plan a depth on each side that stops short of the far wall.
Do you have to pin every joint on a metal model? No. Pin the joints that carry load or sit on a small contact area and leave the rest alone. Pinning can stiffen some joints, but it does not make a model drop-proof, and a pin through thin or hollow material can make that part weaker than it was.


