What are the core miniature painting techniques?
The techniques that matter most for a beginner are priming, base coating, paint thinning, shading with washes, drybrushing, layering, and edge highlighting. They are not rival schools. They are stations on one assembly line, and each one solves a problem the previous step leaves behind.
The backbone is four steps in a fixed order: prime, base coat, shade, highlight. Priming gives acrylic paint something to grip. Base coating maps every area with flat colour. A shade or wash drops shadow into the recesses. Highlighting puts light back on the raised surfaces. A model painted through those four steps is already tabletop-ready, and every advanced technique is a refinement of one of them.
Here is how the core techniques compare, including what each one costs you in time and control.
Technique | What it does | Difficulty | Main trade-off |
|---|---|---|---|
Priming | Gives paint a surface to grip | Low | Heavy coats fill detail, so apply light passes |
Base coating | Blocks in the main colours per area | Low | Rushed coverage shows through every later step |
Thinning | Keeps paint thin enough to preserve detail | Low habit, high payoff | Thinner paint covers less per coat, so you build in passes |
Wash or shade | Flows into recesses for automatic shadow | Low | Can leave tide marks on large flat surfaces |
Drybrushing | Catches raised texture with a nearly dry brush | Low | Fast but chalky, and hard to control on smooth areas |
Layering | Rebuilds light with progressively smaller, lighter coats | Medium | Slow and needs clean brush control |
Edge highlighting | Draws thin light lines along hard edges | Medium to high | Crisp, but unforgiving of shaky lines |
Glazing | Builds translucent colour through many thin passes | Medium to high | Smoothest blends, slowest payoff |
That table is most of the answer. The rest of this guide explains why the order works and which trade-off you are choosing at each step.
Prime and basecoat: the two steps that decide the rest
Priming is the first step every time, and it is not optional. Acrylic paint grips a primed surface far better than bare plastic, and paint applied without primer tends to flake or pool in odd places. Spray outdoors or in a well-ventilated area, follow the manufacturer's safety instructions, and apply light coats from about 12 inches away rather than one heavy blast. Heavy primer coats fill fine detail and take much longer to dry.
Primer colour is a real trade-off. Grey is the safest all-purpose choice because it sits between light and dark and will not heavily tint your base colours. Black primer deepens shadows automatically but makes bright colours harder to build. White primer makes colours vivid but shows every missed spot.
Once the primer is dry, base coating is about coverage rather than blending. You are mapping the model: skin, cloth, metal and leather, each in one flat colour. Use slightly thinned paint so it does not sit thick and bury detail, and plan on two thin coats. Base coats dry in roughly 10 to 20 minutes under normal conditions, so letting the first pass dry is cheap. Two thin coats almost always beat one thick one, and the thin spots you leave now will look worse once a wash pools over them.
Thinning: the habit that fixes most beginner problems
If you learn only one miniature painting technique properly, make it this one. Paint straight from the pot is usually too thick for miniature work. Miniature detail is measured in fractions of a millimetre, and a thick layer fills panel lines and blunts fine texture before you notice.
The target consistency is easy to test: the paint should flow smoothly from the brush with no visible brush marks and cover evenly. If the brush drags, the strokes stay visible, or the coat dries grainy, it is too thick. If the paint beads on the surface, needs four or more coats, or dries streaky with tide lines, it is too thin. Adjust in single drops of water or medium until a single pass is slightly translucent and builds to full coverage in two passes.
Base and foundation paints are designed for coverage, so they can go on near pot consistency for blocking in, or be thinned roughly one-to-one with water for smoother application. Texture paints are the exception: never thin them, because their thickness is the effect.
A wet palette is the cheapest upgrade to your thinning habit. Parchment over a saturated sponge keeps a thinned mix workable for a whole session instead of drying on a dry palette in minutes. Skip isopropyl alcohol for ordinary thinning; it dries far too fast to be practical, and water or medium is the better default.
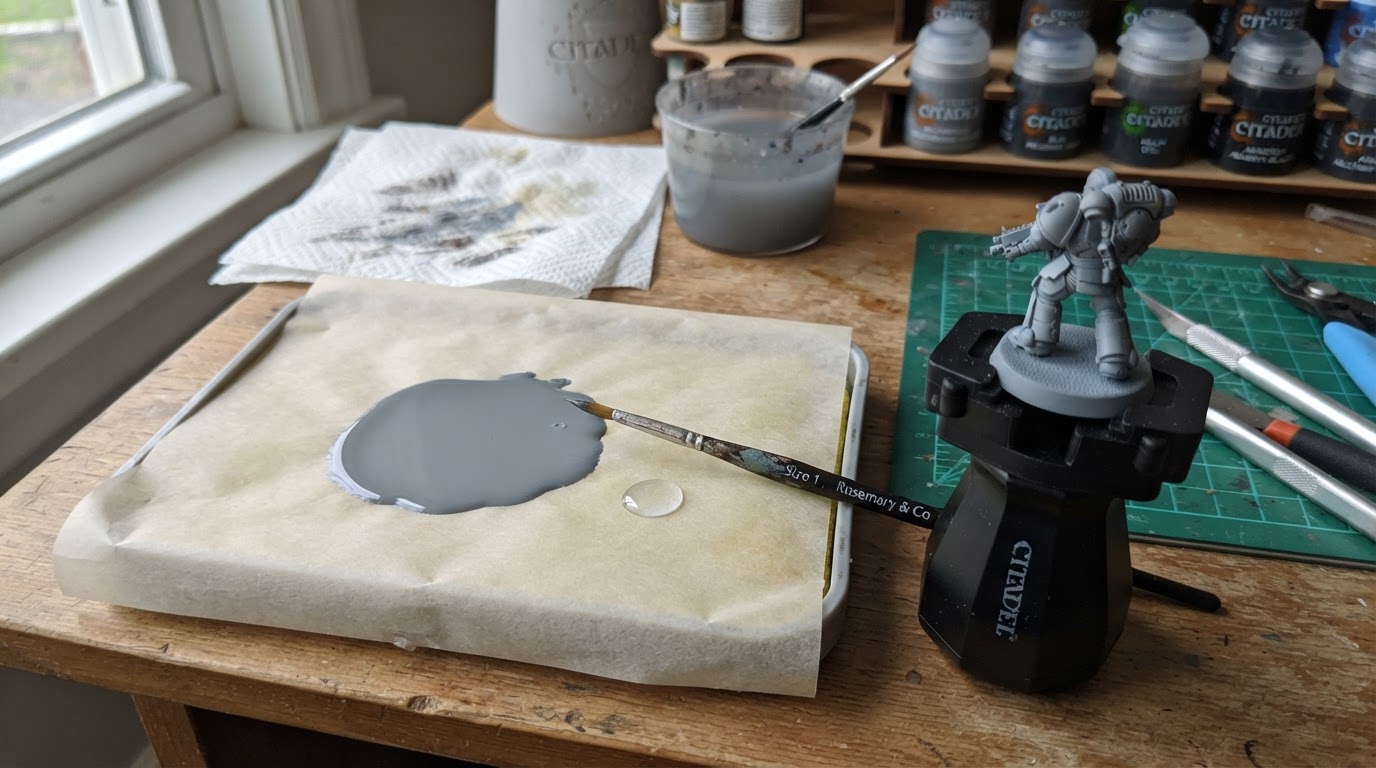
The trade-off is honest: thinned paint covers less per coat, so you apply two or three passes instead of one. In practice that is faster, because you spend no time scraping lumps, rescuing drowned detail, or repainting a ruined surface.
Shading and highlighting: four techniques, four jobs
Once the base colours are down, the model needs contrast from both directions: dark in the recesses and light on the raised surfaces. Four techniques do that work, and they sit at different points on the speed-versus-control spectrum.
A wash or shade is the fastest route to depth. It is a very thin, dark paint that flows into recesses through capillary action, which means the model does the work and you do not need blending skill. Pre-mixed washes are formulated to flow correctly, so they are unusually beginner-friendly. The trade-off is control: flood a smooth cloak and the wash can dry with a tide-mark ring. Apply it in smaller sections, or run it only into the recess lines when a flat surface has no texture to guide it.
Drybrushing is the fastest way to add highlights. You load a brush, wipe almost all the paint off on a paper towel, then drag it lightly across raised surfaces so only the highest points catch colour. It is forgiving, fast, and excellent on fur, hair, chainmail and rough textures. It is also the least precise option: on smooth armour the finish can look chalky, and it catches texture everywhere rather than only where light lands.
Edge highlighting is the precise alternative. You load a small amount of a lighter version of the base colour and paint a thin line along the sharpest edges and raised points. It looks crisp and reads well on armour and cloth, but it takes practice to keep lines thin. Most beginners start with drybrushing and add edge highlighting as their brush control improves.
Layering sits between them. It means building light in steps: a slightly lighter mix applied over most of the raised area, then a lighter one over a smaller zone, each pass shrinking toward the point that catches the most light. It is slower than drybrushing and more forgiving than edge highlighting, and it is the skill that most improves how an army reads at tabletop distance.
Which techniques should you learn first?
Difficulty order is the question beginners ask most, so here is a concrete ladder. Each rung assumes the one before it, and it is a transparent framework you can test against your own results rather than a rule you must obey.
- Base coating. Neat, opaque two-thin-coat coverage is the foundation of everything else, and it trains the brush control the later steps demand.
- Thinning. Learn it alongside base coating, because consistent paint consistency is what makes coverage and layering predictable.
- Washes. Almost free depth, minimal skill required, and it teaches you how paint moves and dries.
- Drybrushing. Fast, forgiving highlights with an obvious completion point: the raised texture catches light.
- Layering. Restores brightness after shading and slowly moves you from flat colour toward blended light.
- Edge highlighting. Add it once your lines are steady, because thin, clean edges reward patience more than speed.
- Glazing. Beginners can use it for simple hue shifts from the start, but the subtle blending effects take practice and many thin passes.
Wet blending and directional lighting belong after that ladder. They are display-painting skills that assume you already understand how paint behaves on the surface, and they are the wrong place to start when your base coats still show brush marks.
How painting styles change the technique mix
Painting styles are not separate toolkits. They are different answers to the question "where should the effort go?" Once you see that, style stops being mysterious.
A clean studio style stacks base coat, wash, layering and crisp edge highlights. The payoff is a sharp, readable model, and the cost is time on every edge.
A grimdark or weathered style leans on washes, drybrushing, texture and muted palettes. It trades crisp edges for atmosphere, and it is forgiving of imprecise lines.
A speed-painting approach reaches for contrast-style paints and underpainting methods such as slap chop, where a drybrushed light base does much of the shading work before colour goes on. It wins on time per model and gives up some control over transitions.
A display style turns to glazing, wet blending and directional light. It produces the smoothest gradients, but it is the slowest lane and the one that most rewards practice on spare models.
The practical lesson: choose the style first, then choose the techniques it rewards. A painter copying display techniques onto a 40-model army is making a time decision, not a skill decision.
A practice path with a completion standard
You do not need a full paint range to get good. A brush, a grey primer, a handful of colours, one wash and a wet palette will carry you through the entire beginner ladder.
Run the path in five models. On model one, prime and base coat only. On model two, add a wash. On model three, drybrush the texture and skip edge highlights. On model four, layer one highlight and edge highlight only the most visible edges. On model five, repeat the whole sequence without looking up the steps.
Your completion standard is observable, not emotional. A finished figure should show opaque colour from two thin coats, recesses that are visibly darker than the raised surfaces, and edges that read clearly at arm's length. If those three checks pass, the model is tabletop-ready and the technique worked. If a check fails, you know exactly which step to practise next.
The limitation to accept: this path produces tabletop miniatures, not competition pieces. Non-metallic metal, freehand and directional lighting take many hours per model, and they are easier to learn once the basics are automatic.


