How to paint a miniature: the layer order that works
Everything you put on a miniature is built in layers, and the order does the heavy lifting. Clean the model, prime it so paint has something to grip, block in flat base colors, let a wash darken the recesses, bring the light back with thin layers on the raised shapes, then base and varnish it so the work survives handling.
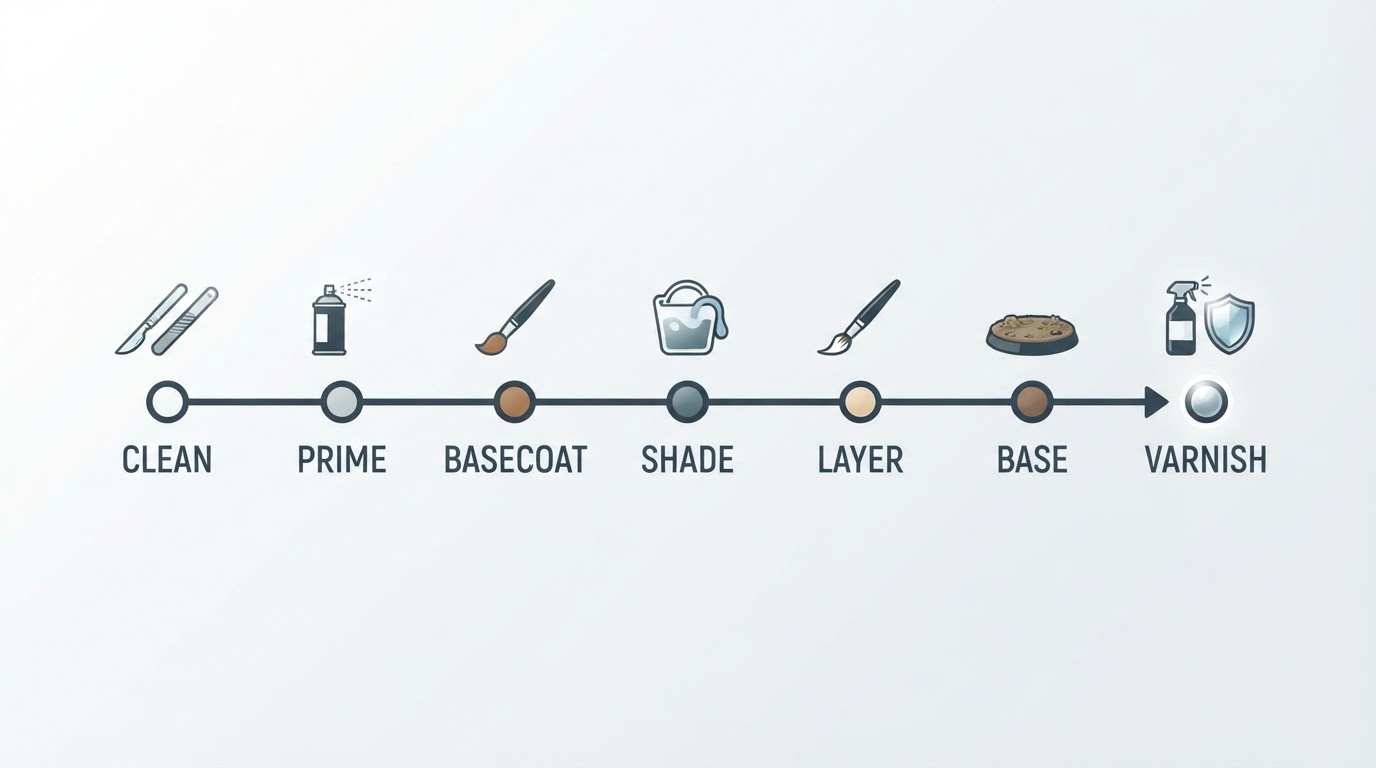
Skip a stage and the next one exposes it. Paint beads on bare resin, a wash dries patchy over a glossy surface, and varnish lifts paint that never bonded. The sequence below is the same for a 28 mm skirmish model and a display piece. What changes is how much time you spend in each stage, not the order.
Stage | What it does | You are done when |
|---|---|---|
1. Clean and tidy | Removes mold lines, dust, and release agent | The surface is smooth under a lamp and paint no longer beads |
2. Prime | Gives the paint a tooth and one uniform starting color | The coat is even and matte, with detail still crisp |
3. Basecoat | Blocks in each color flat and opaque | Color is even, with no primer showing through |
4. Shade | Sinks a darker tone into the recesses for instant depth | Recesses read darker while flat panels stay close to the base color |
5. Layer and highlight | Rebuilds the midtone and adds light on raised shapes | The model reads with contrast from arm's length |
6. Drybrush | Catches texture on fur, mail, and bases fast | Raised texture is lighter, with no streaks on flat panels |
7. Base and varnish | Ties the model to its scene and seals the paint | The base is textured and the model is uniformly matte or satin |
Set up a workspace that fits an apartment
Good miniature painting needs less space than most people assume. A rimmed tray, a kitchen table, and a clip-on lamp with a daylight bulb cover almost everything you need. The tray matters more than it sounds: it contains water spills, runaway heads, and loose flock, so a shared table returns to a dinner table in one lift.
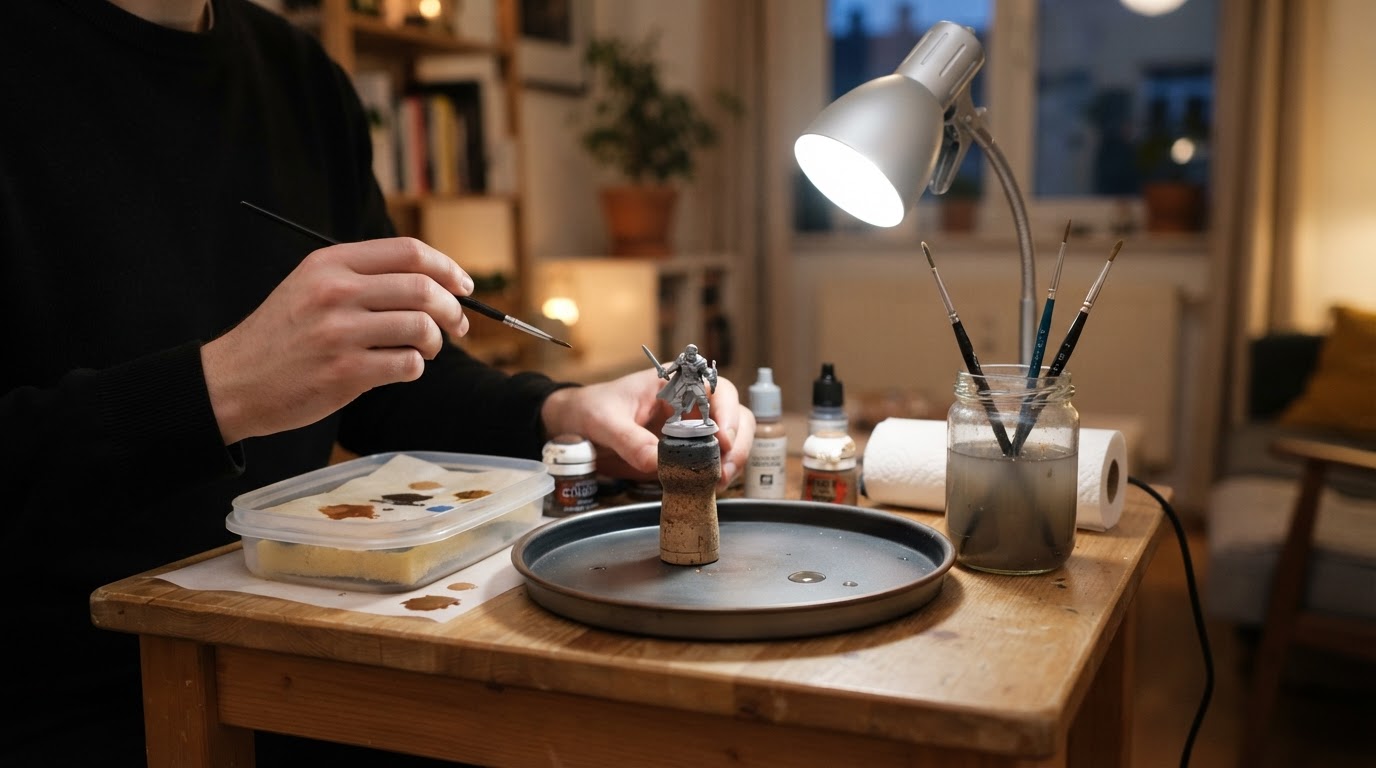
Work in front of the lamp, not behind it. Shadow falls where your brush is heading, so light that comes over your shoulder hides the details you are trying to see. A bulb in the 5000–6500 K range with a high color rendering index keeps skin, bone, and steel looking the way they will under normal room light.
In a miniature painting setup, a wet palette is the single biggest time-saver for a beginner. A shallow container, a damp sponge, and a sheet of baking parchment keep thinned paint workable for a whole session instead of drying on a tile in minutes. Add a water cup, a paper towel, and something to hold the model, such as a cork or a painting handle, so your fingers stay off the paint.
Ventilation is the one thing you cannot improvise. Spray primer needs moving air, so take it outside, to a balcony, or to a doorway rather than spraying at a kitchen table. If outdoor spraying is not an option, use a brush-on primer indoors and keep the room ventilated while it cures.
Step 1: Clean the model and remove the mold lines
Wash the model before you paint anything. Warm water, a drop of dish soap, and a soft toothbrush strip mold release and skin oils from a plastic kit, and they remove uncured resin residue from a 3D print. Rinse, then let it air dry completely.
Mold lines are the thin ridges left where two halves of a mold met, and they are the first thing a viewer notices after you finish painting. Hold the model near a lamp and tilt it until a line catches the light, then scrape the ridge with the back edge of a hobby knife or a dedicated mold line remover. Use light, repeated passes that follow the line. A blade that digs in leaves a groove that primer cannot hide.
Follow up with a fine sanding stick on stubborn lines, sprue nubs, and the seams where arms and heads attach. If a gap is wide enough to see through, press a little putty into it, smooth it with a damp finger, and sand it back once dry. Before priming, dust the model off and check it once more under the lamp. This stage is unglamorous, and it is the difference between a clean paint job and a plastic-looking one.
Step 2: Prime so the paint has something to grip
Primer is not decoration. It gives the slick plastic or resin a surface that acrylic paint can bite into, and it gives you one starting color so every later layer behaves predictably.
If you use a spray can, shake it well, warm it in a bowl of warm water if the can feels cold, and work in short passes rather than a single blast. Start the spray beside the model and sweep across it, roughly 20–30 cm away, building two or three thin coats rather than one wet one. Spray too close or too long and the coat fills detail and stays sticky for days. Cold and humid weather can leave a chalky finish, so check the forecast before committing a whole squad.
Brush-on primer is slower and better suited to an apartment. Two thin coats, each fully dry, give the same grip as a spray without the overspray. Choose your primer color with a purpose. Black hides mistakes and suits dark armies or metallic schemes, but bright colors need several layers over it. White makes yellows, reds, and skin easy, and it punishes any spot you miss. Grey is the middle road.
For a free head start, try a zenithal undercoat: prime black, then spray or drybrush grey and white from directly above. The light that remains on the model after priming tells you where to highlight before you have chosen a single color.
Step 3: Block in basecoats with paint thin enough to flow
A basecoat is flat, opaque color, and flat beats thick every time. Thin the paint on your palette with a little water until it moves like skim milk, wick the excess off the brush onto a paper towel, and apply two thin coats instead of one heavy one. Paint straight from the pot goes on like syrup, dries with visible ridges, and buries the detail you paid for.
Load the brush, not the model. A size 1 or 2 round brush with a sharp tip will handle most of a 28 mm figure, and a fine detail brush takes care of eyes, straps, and trim. Work from the deepest parts outward so your hand does not drag over wet color, and keep the model on a handle so the only thing you touch is the base.
Pick a small palette on purpose. Three or four main colors plus a wash and a lighter tone for each color gives a miniature a readable identity on the table. Every extra color you add competes with the others, costs you time, and rarely shows at arm's length.
Wait for each coat to dry before adding the next one. If the new coat pulls the old one around, the layer underneath was still wet. Touch-ups are normal; painting into wet paint is what creates muddy texture.
Step 4: Shade with a wash and get depth in one pass
A wash is thin paint with low surface tension, so it flows off raised shapes and settles into recesses. That is what makes it the fastest source of depth in the hobby. Load a brush and touch it to the top of a fold, into a gap, or under an arm, then guide the pigment where gravity already wants it to go.
Control matters more than volume. Flooding the whole model turns a clean basecoat into a muddy one, and washes that dry in puddles leave shiny rings. Work one area at a time, soak up any pool that forms on a flat panel with a dry brush, and thin the wash slightly if it stains more than it sinks.
Color choice does the work. A brown or dark red wash flatters skin, leather, and cloth. A black wash deepens steel and armor but greys down warmer surfaces if you use it everywhere. Whatever you choose, remember the trade-off: a wash without a lighter layer after it makes a model look dirty rather than shaded.
Step 5: Layer and highlight to bring the light back
Once the wash is dry, repaint the base color on the flat and raised areas to clean up any stains. Then add two or three increasingly lighter mixes, each one covering a smaller area than the last. Keep the lightest paint on the shapes that face your light source and along the edges the light would catch.
Paint thin layers, and let each one dry. Thinning heavier paint with a drop of medium instead of water keeps a strong pigment load and slows drying, which helps on a warm day. For clean edges, use the side of the brush along a hard edge rather than the tip, and wipe the brush nearly dry first.
Blending without an airbrush
Blending is the same idea taken further, and it is where the trade-off lives. A glaze, thinned until it is a tint rather than a coat, is layered over a dried surface in several passes until the transition between two colors disappears. On a larger shape you can also wet-blend two colors together while both are still wet. Both techniques work, and both cost time that a table-ready figure does not need. At arm's length, clean layers with strong contrast read better than a smudged blend with no contrast.
Step 6: Drybrush the textures that reward it
Drybrushing is the one technique where being almost out of paint is the point. Load a dry brush with a lighter color, wipe it on a paper towel until the towel takes back nearly everything, then drag it across the surface so only the raised texture picks up paint.
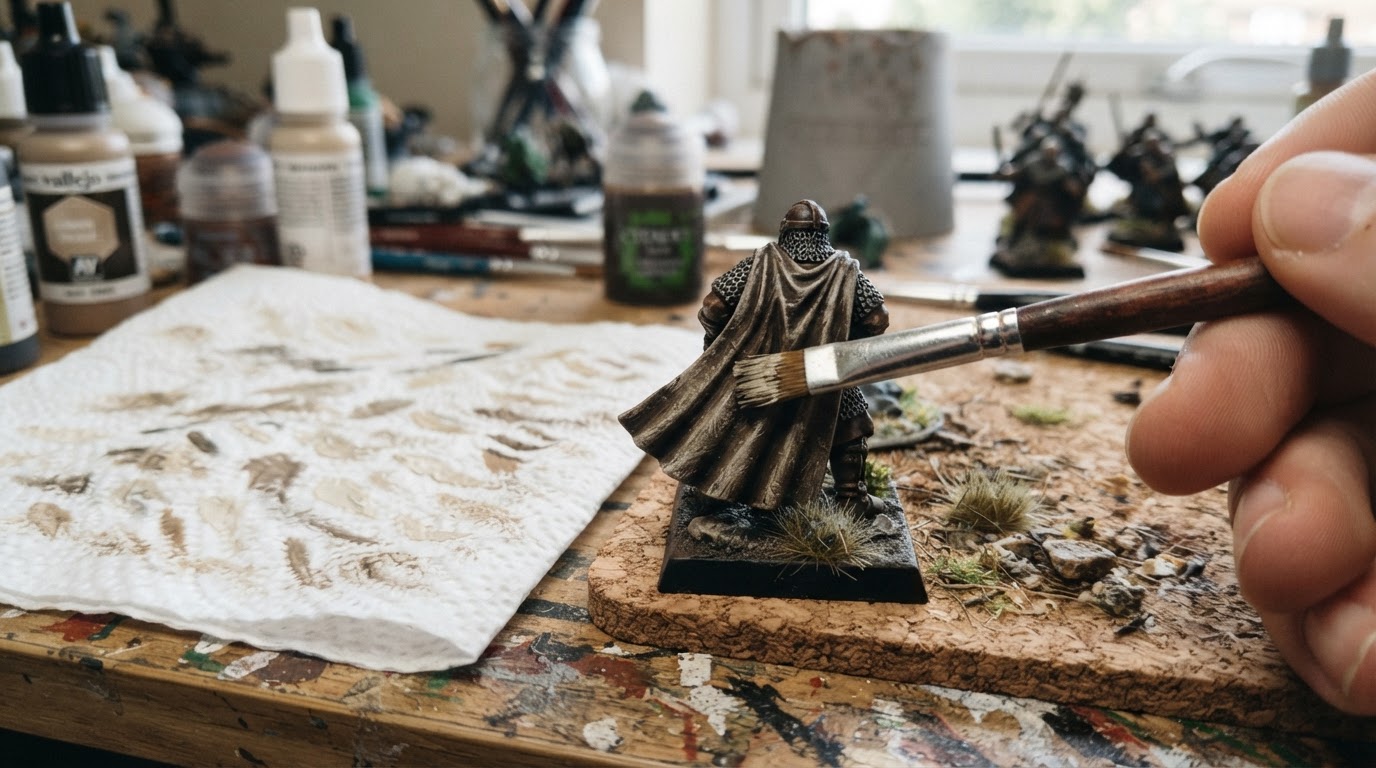
It is unmatched on fur, chainmail, patterned cloth, stone, sand, and base texture. It is the wrong tool on smooth, flat armor and large skin areas, where it leaves chalky streaks and a dusty look. Keep the strokes light and build up gradually; stopping one pass early is easy to fix, and a chalky streak is not.
Drybrush after the wash, not before. The wash darkens the recesses, and the drybrush then catches the raised texture and creates contrast in a single step. If a stray streak does land on a flat panel, a thin coat of the base color covers it once the drybrush layer is dry.
Step 7: Base the model and varnish the paint job
A base is what makes a miniature look finished rather than floating. Spread a little texture paste or glue-and-sand across the top, press in a few small stones if you like, and let it set. Paint it a dark earth tone, drybrush it lighter, and add a tuft or two. Paint the rim a solid dark color for a tidy edge, or match it to the army's scheme.
Varnish protects everything you just did. Matte varnish also kills the shine that washes and handling leave behind, which makes the whole figure photograph better. Spray varnish in thin coats from a comfortable distance, and check the humidity first; spraying in cold, damp air is the classic cause of a frosted, cloudy finish. Brush-on varnish is the safer indoor choice, and it works the same way: thin coats, fully dry in between.
If you take one thing from this stage, make it the varnish. Paint on a table-worthy model gets touched, transported, and dropped, and the varnish is the reason the paint stays where you put it.
Time-saving habits that keep the standard honest
Two thin coats dry faster than one thick coat that later needs repair. Batch the boring stages, priming and basecoating five models at once, while saving the careful work for one model at a time. Miniature painting is a motor habit as much as a visual one, so keep the same order on every model and let your hands stop thinking about the sequence.
Set your completion standard at table-ready rather than display-ready. A gaming model is read from arm's length on a table, where contrast, a clean base, and a readable face matter far more than a perfect transition. Finishing a mini to that standard in a few short sessions teaches you more than a month of heroic attempts on one figure.
Finally, paint in short sessions and use a wet palette to carry paint between them. Twenty focused minutes at the end of the day beats a two-hour block you keep postponing.
Common mistakes and how to unlearn them
Most miniature painting mistakes come from the same three habits: paint straight from the pot, a brush that is too wet, and a stage that gets skipped.
Paint straight from the pot causes texture, lost detail, and visible brush marks, because the pigment never has a chance to level out. Thin it on a palette instead.
Priming too close, too thick, or in the wrong weather produces a fuzzy or sticky coat, and drybrushing with a wet brush produces chalky streaks. Both are fixed by using less paint and more patience, not by buying a different tool.
Letting a wash pool on flat surfaces leaves rings and stains; wick the pools off while they are still wet. Handling the model with bare fingers transfers oils that repel paint, which is why a painting handle earns its place on the bench.
Skipping the varnish undoes all of it quietly, one game at a time. And painting eyes or fine details before the rest of the figure is blocked in means doing that detail work twice.
Common questions from first-time painters
Do I need an airbrush to start? No. A brush-on or spray primer, a couple of brushes, and a handful of paints are enough for a complete first miniature. An airbrush speeds up priming and large surfaces later, but it is a convenience, not a requirement.
How long should a first miniature take? Measure it in sessions rather than hours. Cleaning, priming, and basecoats can happen in one sitting, the wash and layers in another, and the base and varnish in a third. Short sessions keep your hand steady and your standards realistic.
Can I paint a resin print straight off the printer? Only after it is washed and fully cured. Rinse uncured residue away with warm soapy water, cure the print completely, and wear gloves while handling it. Release agent and uncured resin both repel paint, and the surface will stay tacky no matter how good your primer is.
How many paints do I actually need? Fewer than the shelf suggests. One base, one wash, and one lighter tone per main color covers a first model, and you can mix most intermediate shades yourself. Add colors when a specific model calls for them, not before.
What if my paint looks chalky or gritty? That usually means the layer was too thin in the wrong way, too many layers built up roughness, or a wet brush was used for drybrushing. A thin coat of the base color over the area resets it, and the next attempt with more pigment and less water usually behaves.