What the Patch Can and Cannot Tell You
A waterslide decal sits on thin clear carrier film that must make close contact with the paint. On a rough, dusty or textured surface, air can stay trapped underneath, and light through those pockets reads as a pale or milky marking. That is the usual account, not a diagnosis: a sheen difference or a carrier edge can look similar under raking light.
Microscale's instructions assume a clean, smooth, glossy surface, and its Microscale FAQ suggests brushing a layer of Micro Set on the model first, which the manufacturer says helps the decal avoid silvering from water alone. The FAQ also recommends testing a sample before committing a decal to a finished model. Films and directions differ, so each label is the authority.
Separate the Observation From the Possible Cause
Look at the patch under raking light first; three appearances get called silvering, each with a different check.
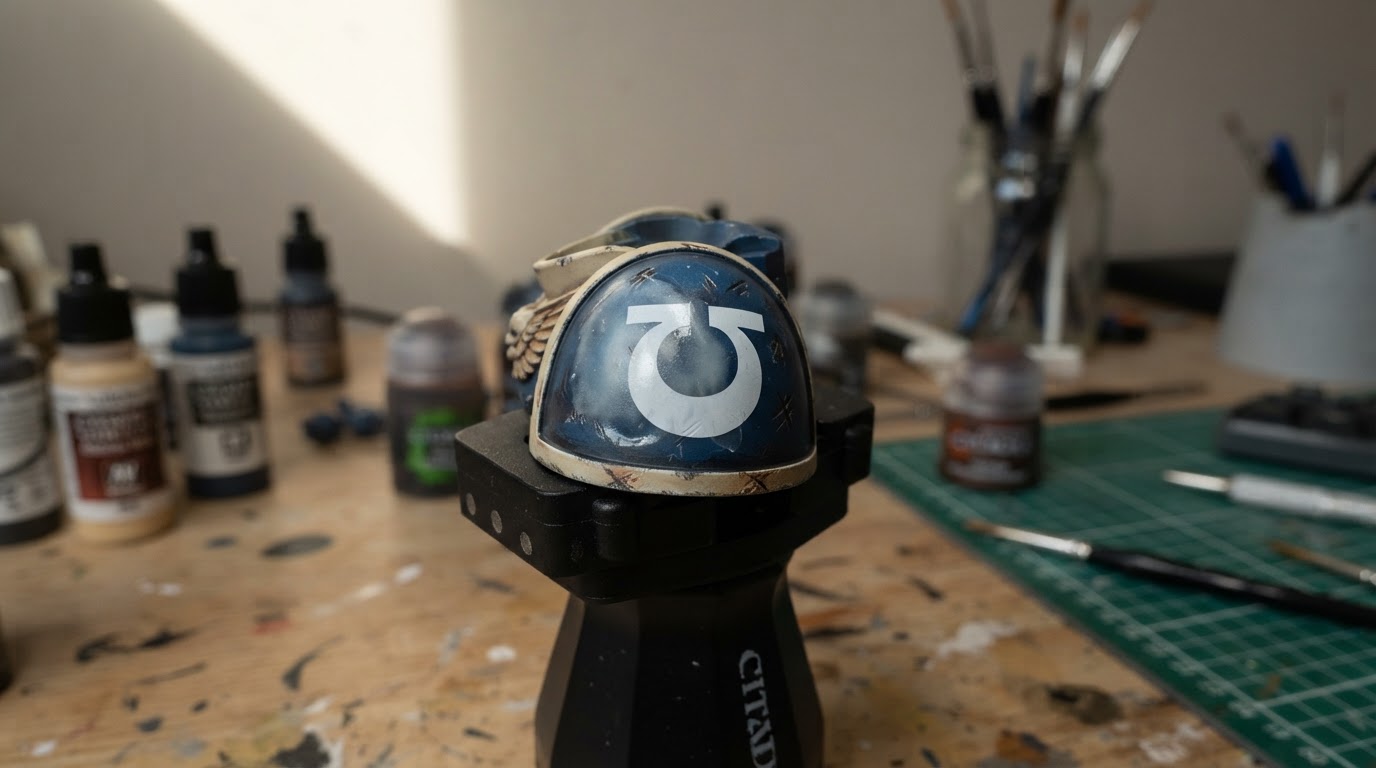
What you see | What it may be | Cautious next check |
|---|---|---|
Pale patch inside the film | Air or moisture under the carrier film is one explanation, not a certainty | Is it fully dry, and has it been sealed? |
Uniform shine across artwork and film | The film's gloss reading against flatter paint | Compare with the surrounding paint |
Thin outline around the artwork | A visible carrier edge | Inspect closely; trim closer next time |
These appearances overlap, and none proves a single cause. Treating the wrong one varnishes the defect into place, and neither more varnish nor more softener is guaranteed to rescue a patch.
Check Before You Add Anything
- Is the decal fully dry? Microscale's directions for Micro Sol say to leave a softened decal untouched until it has dried. Touching a reacting decal is how markings get wrinkled or torn.
- Is the model already sealed? That decides whether the film is still reachable.
- Do you have a spare transfer and a painted sample? Test there, not on the finished figure; compatibility depends on film, paint and product.
If the Film Is Unsealed
Work only as far as the product's directions and a spare test allow. The Microscale FAQ describes Micro Sol as the stronger solution, used on irregular surfaces, where it softens the film to fill contours, rivets and crevices and improves adhesion by eliminating tiny bubbles. That is a described use, not a universal rescue.
Follow each label for solution, order, applications and waiting time. Do not substitute a stronger solvent because one softener did not work immediately, or assume one brand's sequence carries over to another. Stop rather than escalating; there is no acetone step here, and no pin-pricking routine is safe on every film and paint.
If the Decal Has to Come Off
The Microscale FAQ files its warning about prolonged Micro Sol under its removal instructions: leaving the softener on too long can lift paint, and the manufacturer asks for a fresh water rinse afterwards. That warning belongs to removal, not to repairing silvering. It is not a universal application step and should not be used on a decal that is currently reacting. Leave the decal alone until dry and follow the label.
If the Film Is Already Sealed
Cured varnish is a barrier. A softener on top may never reach the air pocket, and working through the coat risks the paint beneath. The FAQ notes decals can be removed provided the model has not been oversprayed with a finishing coat, and in that manufacturer's context, once a gloss, satin or flat finish is on, stripping and repainting may be required. That is guidance for its own products, not proof that stripping is the only route.
Three honest options remain: leave a minor patch, change the surrounding sheen so it reads less obviously, or replace the decal and repaint. None is guaranteed. The site's guide to Warhammer decals before or after varnish separates the preparation coat from the protective coat, the distinction that decides whether a fix remains possible.
Prevent It on the Next Transfer
Start with a clean, smooth, compatible surface and a fully cured base. Use the setting solution your product specifies and follow its label for order and dwell time, covering the whole decal footprint. Wick water and air from the center toward the edges without dragging, leave it undisturbed while it softens, dry it as long as the directions say, then apply a compatible protective coat.
Complete when the film edge sits flat, the sheen matches the paint, and the marking is unchanged through a full drying interval. If the sample fails, change the surface prep rather than adding another varnish layer.


