Why resin and FDM print miniatures differently
Resin printers, both SLA and MSLA, build a figure by curing liquid resin one thin layer at a time. Their working band sits around 25 to 50 microns per layer, fine enough that a nose, an eye socket, and the thin edge of a cloak survive the print. FDM printers melt and extrude plastic filament instead, and their practical floor sits at 150 microns and up. That gap is the single biggest reason one sculpt looks crisp while the same file, printed on the other machine, shows ridges across every smooth surface.
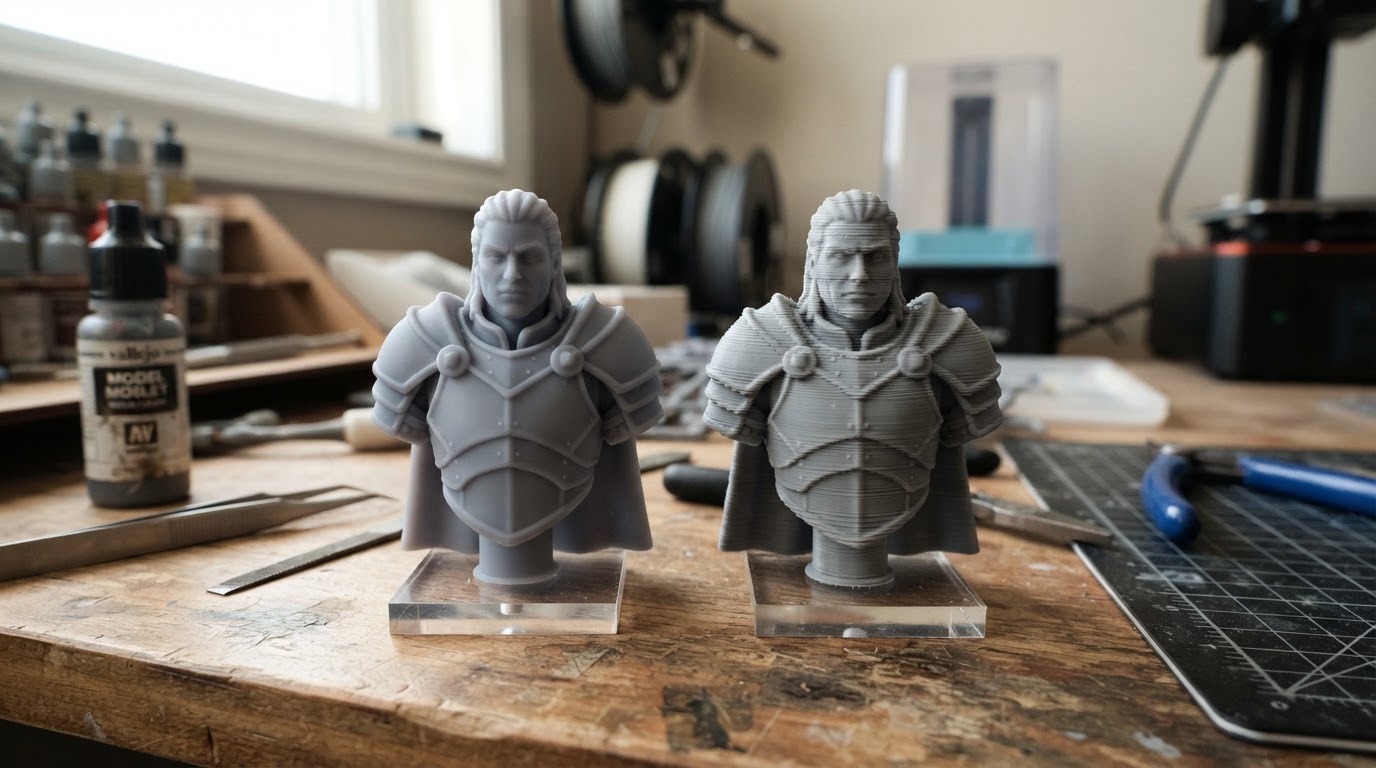
On a 28 mm tabletop figure the difference shows up in the same three places every time: faces, thin weapons, and cloth. Resin holds all three, which is why character models and display pieces usually come off a resin printer. FDM stays useful because it produces tough parts at volume, which suits terrain, vehicles, bases, and the larger scenery pieces players handle every session.
The trade-off is not only visual. Thin resin parts are brittle and need careful handling and storage, while FDM parts tolerate being dropped into a figure case. Neither machine hands you a paint-ready surface straight off the plate, and neither removes the cleanup step that follows every print.
Find files that are ready for the scale you play
Where printable files come from
Most beginners start from an existing sculpt instead of modeling their own. Print-ready files commonly come from four places: creator marketplaces such as MyMiniFactory and Cults3D, free community libraries such as Thingiverse, subscription sculptors who release monthly packs on platforms such as Patreon, and bundles sold directly by sculptors for personal or commercial use.
Three checks save the most frustration before you spend resin or filament on a file:
- Presupported or bare mesh. Presupported releases save hours in the slicer, but their supports were sized for the sculptor's printer and resin, so expect to review them anyway. A bare mesh gives you full control and full responsibility.
- License terms. Personal use and commercial use are different permissions, and a file that is free to print is not automatically free to sell. Read the listing before you plan an army around it.
- Stated target scale. A sculptor who names the intended scale and base size has already done the hardest math. A file with no scale note needs a test print before you batch it.
Scale, bases, and resizing safely
Tabletop scales are shorthand rather than a precise measurement of the figure. 28 mm and 32 mm heroic cover most skirmish and roleplaying characters, while 15 mm and 6 mm serve mass battles, vehicles, and scenery. The shorthand matters because a model sculpted for one scale carries different proportions, base sizes, and weapon lengths than the same character drawn for another.
Resizing happens in the slicer as a percentage applied to all three axes at once. Shrink a 32 mm heroic figure to 90 percent and you also thin the ankles, weapon shafts, and base lip by the same proportion. Check the base diameter against the grid or unit you actually play on before you commit, and prefer scaling up over scaling down when surface detail matters. Scale the model first and add supports second, because supports sized for the original figure will not line up on a resized one.
Slicing, supports, and the layer height decision
Orientation and supports
Print orientation decides where layer lines land and where support scars appear. Tilt a model, often around 45 degrees, so the cross-section stays manageable and the surfaces you care about face away from the plate. Supports should land on hidden areas: the underside of a cloak, the back of a leg, the inside of a shield arm. Lighter supports leave smaller contact points and less cleanup, but a model that is under-supported will drop into the vat or peel away from the plate. Review the sliced preview layer by layer before starting a long print, since a five-minute check is cheaper than a failed build.
FDM follows the same logic with different physics. Overhangs beyond a shallow angle need support, a brim or raft can rescue a part that refuses to stay stuck, and support scars tend to be rougher, so orient the model so those scars land where paint and basing will hide them.
Layer height: detail against time
For resin, the detail band is that 25 to 50 micron range, and the practical choice is the coarsest layer height that still holds the detail you care about. Halving layer height roughly doubles the number of layers and the print time, so chasing the finest possible setting on every model costs hours for detail that primer, paint, and a tabletop viewing distance will hide. FDM works at 150 microns and up, where layer height trades surface smoothness against print time in the same way.
Run resin safely in a small apartment
An apartment workbench raises the safety bar rather than lowering it. Uncured resin is a skin sensitizer, and the most common way hobbyists develop a reaction is repeated bare-handed contact over months. Ventilation matters just as much: resin and alcohol fumes should leave the room, not settle in it. An open window with a fan pulling air away from the printer is worth more than any air freshener.
The checklist that keeps a small space safe:
- Nitrile gloves on before you touch the vat, the build plate, or a freshly printed part.
- Eye protection whenever you pour resin or pry a print loose.
- An open window plus a fan moving air out of the room while the printer runs and while you clean up.
- A dedicated tray, mat, or container for anything that touches uncured resin, kept away from food surfaces.
- Waste handled properly: cure liquid waste and contaminated paper under UV before it goes in the trash, and never pour resin or dirty alcohol down a drain.
- Storage out of reach of children and pets, with lids sealed and the workspace wiped down after each session.
Wash, cure, and take the supports off
The finishing order is not arbitrary. Washing removes uncured resin so the surface can cure evenly, supports come off before the part becomes fully hard, and sanding waits until the surface is cured and dry.
- Wash the print in 99 percent isopropyl alcohol. A two-container routine works well: a dirty first bath that takes most of the resin off, then a cleaner second bath. A soft brush reaches recesses, and the gloves stay on the whole time.
- Remove supports with flush cutters once the part is washed and dry. Cut at the contact point rather than pulling, so you do not tear a small detail off with the support. This is easier before the final cure, while the resin still has a little give.
- Cure the part under UV. Turn it during the cycle so no face sits in shadow, and stop when the surface is hard and dry rather than extending the cycle, because over-curing makes thin parts more brittle.
- Sand the contact nubs and any visible layer lines with 600 grit or finer. Work under a raking light so the surface texture is visible, and brush the dust off before priming.
The completion standard for this stage is simple: the model is fully dry, free of tacky spots, free of support stubs, and smooth enough that a coat of primer will not pool around leftovers. If any of those fail, fix it now rather than under paint.
FDM prints skip the wash and the cure but not the cleanup. Remove supports and brims, trim stringing and blobs with a sharp blade, and sand the contact points before priming.
Which printer fits which job
Choose resin when
- The model has a face, fingers, folds, or thin parts you want to read at arm's length.
- You are printing single character figures, character busts, or small display pieces.
- You can give the printer ventilation and a wash-and-cure routine in the same space.
Choose FDM when
- The parts are handled hard: terrain, vehicles, bases, tokens, and large scenery.
- You want volume and durability more than fine surface detail.
- You would rather skip alcohol and UV steps, and filament fumes are the ventilation problem you are set up to handle.
What you are weighing | Resin (SLA and MSLA) | FDM |
|---|---|---|
Surface detail | Holds detail at 25 to 50 microns | Layer lines show at 150 microns and up |
Durability | Thin parts are brittle | Tough under table handling |
Post-processing | Wash, cure, supports, sanding | Supports, trimming, sanding |
Strongest first projects | Character figures and busts | Terrain, bases, and large pieces |
A decision order that avoids regret:
- Pick the class first, using the table above, because that choice fixes your post-processing routine and your ventilation needs.
- Compare machines inside that class on the numbers that matter to you: build volume against the largest model you actually want to print, the resolution band, and the footprint of the machine plus its wash and cure station.
- Check the consumables last. Resin, alcohol, replacement films, and filament are the recurring costs, so local availability matters more than a one-off discount.
- Confirm the details on the listing itself. Specifications, prices, and included accessories change often, so read the current product page instead of trusting a summary from last year.
Starter prints that teach the workflow
Three projects cover most of the learning curve without wasting a bottle of resin.
- A small test piece at the detail end of your range. It teaches exposure, wash, and cure on a part you can throw away. Completion standard: the smallest intended detail is crisp, the surface is dry, and nothing feels tacky.
- One character figure at the scale you actually play. It teaches orientation, supports, and cleanup on a model that has to survive handling. Completion standard: it stands flat, the base is level, and no support stubs remain on visible surfaces.
- A set of bases or scatter terrain. It teaches volume work and durability, and it gives you pieces that hide imperfect supports under paint and texture. Completion standard: consistent height, flat seating on the table, and no part that flexes when picked up.
When a print fails
Failures are usually visible before the print finishes, and the symptom points at the cause.
Symptom | Likely cause | First check |
|---|---|---|
Nothing on the plate, or a flat pancake in the vat | The print never adhered or peeled free | Plate leveling, then support contact area |
Detail looks soft and swollen | Overexposure | Shorten the exposure and reprint the test piece |
Detail looks missing or rounded off | Underexposure | Lengthen the exposure and check resin temperature |
Supports snapped mid-print | Under-supported or badly angled | Add supports on the lowest overhangs and re-angle the model |
Nozzle clogs and thin extrusion | FDM extrusion problem | Nozzle condition, filament path, and slicer flow settings |
Layers shift sideways | Loose mechanical motion | Belt tension and the printer's footing |
A corner lifts off the bed | Bed adhesion | First-layer height, surface cleanliness, and a brim for tall parts |
None of these fixes require new hardware. Change one variable at a time, reprint the smallest part that shows the problem, and keep a note of what you changed so the next batch starts from a known setting.
Prime after the cure, not before
Priming belongs at the end of the print workflow, once the model is cured, dry, and sanded, and before any paint touches it. Primer gives paint a surface to grip and it reveals the defects you missed, which is exactly why it goes on before you commit to a color scheme. A thin coat from a rattle can or airbrush, applied in light passes rather than one heavy layer, will show every remaining seam, nub, and fingerprint.
The handoff to painting is where print quality turns into a result you can see. A print that is smooth at this point disappears under primer and paint, while a print with leftover nubs or uncured patches keeps showing them no matter how good the paint job is. When in doubt, print one figure, finish it completely, and adjust the next batch based on what the primer reveals.


